Manage User Application Permissions

If you are a security officer and you wish to manage user application permissions, complete the following steps:

  1. From any page in MyGaDOE, hover your mouse over the Search Type icon.  This icon will vary based on the type of search chosen.  When the page first displays it defaults to the district search option ( Search Type Icon ).  In any event, the icon is located just to the left of the Search text box
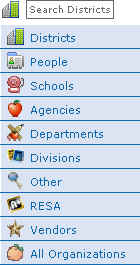
 (Search Text Box).  The Search dropdown menu displays, as shown below.

Search Menu

The Search dropdown menu displays when you click the Search icon

  1. Click the People icon (The People search icon).  The Search menu resets to perform a people search, as shown below.

Search bar reset for people search

The Search menu reset to search for people instead of districts - note how the icon has changed from the District search icon to the people search icon

  1. Click inside the Search text box to place your cursor there.

  2. Enter the name of the person, you want to find.

  3. Press the Enter button (Return on Macintosh computers).  MyGaDOE searches its database and displays the Search Results page, as shown below.

The Search results page

The Search results page

  1. Click the Edit (The Edit icon) icon next to the person whose permissions you want to edit.  The Edit User Permissions page displays, as shown below.

The Edit User Permissions page

The Edit User Permissions page

  1. Click the Assign Roles button.  The Assign Roles page displays, as shown below.

Warning:  If you are provisioning someone for the role of Security officer, they must not only be designated as a security officer in organizational roles, but also as a security officer in application roles.

The Assign Roles page

The Assign Roles page is divided into Assign Organizational Roles and Assign Application Roles

  1. Click the Expand Section (The Expand Section icon) icon to the left of the section you want to modify.  The section will expand, as shown below.

The Assign Organization and Roles page

The Assign Organization and Roles page

  1. The column starting with the State radio button contains the organization selection section and the list of available roles.  The upper part of the column contains the former and the lower part, while the lower part contains the latter (populated based on the organization selected).  In the example above, the list of available roles begins with "Area Consultant".
    To the right of the column containing the organization selection section is the column containing organization roles that have already been selected.  In the example above, this column begins with "Administrator (Facilities).

  2. To add a role, click the Add (The add role or permission icon) icon to the right of the role you want to add.  It displays in the right hand column to show that it has been selected.

  3. To remove a role, in the selected role column, click the Remove (The delete role or permissions icon.) icon to the right of the role you want to remove.  The item is removed and no longer displays in the list.

Note:  The same process holds true for the Assign Application Roles section, except that changes here refer to roles within specific applications rather than roles within the organization.

  1. When finished making changes, Click the "Save Org Role(s)" button to save changes to organizational roles, and the "Save App Role(s)" button to save changes to the application roles.

  2. If business owner approval is required for any of the changes, a message will be sent to the appropriate business owner and a message will be displayed to this effect.  Otherwise, the changes will take place the next time the user logs into MyGaDOE.